
Tutorial: getting started with AR
- Jul 31, 2020
- 7 min read
Updated: Aug 4, 2020
In the previous tutorial, we announced that we would have a separate one about AR and The Microsoft HoloLens. Well, here it is... This tutorial explains which AR devices are used within MirrorLabs and how to develop for an Android smartphone and the Microsoft HoloLens 2. #augmentedreality #hololens #tutorial #unity #vuforia
Introduction to AR
The acronym “AR” is used for the term “Augmented Reality”, which is applicable for any situation where the visual perception of a user towards his surroundings is altered with artificial/virtual content. This augmentation of [perceived] reality can be achieved in a variety of ways, starting with the simple 2D projection of an image on a wall. However, in the context of this tutorial (and MirrorLabs) two primary techniques for altering a user’s perceptions are utilized. First being “camera feed overlay”, where for example the camera of a mobile phone is used to obtain a continuous video feed of the surroundings while an application augments this video feed in real-time. The resultant pictures are presented to the user which hence sees his surroundings altered/enhanced with digital content.
And second “optical see-through” [OST] – “head-mounted devices” [HMDs]. Using transparent screens or projection surfaces positioned in front of the user's eyes, these devices are able to augment the vision of a user directly. Furthermore, since the vision of both eyes can be augmented individually, it is possible to accurately project 3D objects in space.
AR OST-HMDs:
MS HoloLens v1
MS HoloLens v2
Magic Leap
NReal (to be released soon)
Microsoft HoloLens: Rather than a simple device, “Microsoft HoloLens” or simply “HoloLens” is a platform developed and supported by Microsoft, where the first device was released in March 2016. Until the release of the second generation of the device, it was the dominant off-the-shelf device used for AR applications and developments. The combination of sharp 3D projections in space while the device keeps tracking its position in space allowed users to place virtual content in space and walk around it while it maintained its position in the real world. E.g. a virtual cat remains sitting on the table exactly in the same position no matter how the user with the device moves around the room. In addition to the impressive capabilities of the platform itself, Microsoft released a specific toolkit (Mixed Reality Toolkit [MRTK]) to enhance the application production speed and simplify the lives of developers all around the world. For now, we will not go into too many details regarding the MRTK, this will be covered in a separate tutorial.

1 OST-HMD example, MS HoloLens 2
Tutorial: Introduction to Augmented Reality Development using Vuforia
The following tutorial describes how to set up the development environment and deploy the identical application to an Android smartphone and on a Microsoft HoloLens 2.
Step 01: Download and install Unity Hub:
1. follow the setup instructions
2. select ‘installs‘ and then ‘add‘ (Blue button)
3. select version 2019.3.1f1 (Or any 2019.4 version labeled with (LTS))
4. enable the following packages (check-boxes):
Microsoft Visual Studio (Dev Tools)
Android Build Support
Universal Windows Platform Build Support
Windows Build Support

Step 02: Download Visual Studio installer:
1. Open the Visual Studio Installer > click “more“ and then “modify“
2. Enable the following packages (check-boxes):
.NET desktop
Desktop Dev with C++
GameDev with Unity
UWP dev (only for HoloLens things needed)
3. Click “modify“ and wait until all tools are installed
Step 03: Create a new project in Unity
1. Click “projects“ > “new”
2. Select the just installed version (2019.3.1f1)
3. Select 3D for template
4. Give your project a name
5. Click “CREATE “
Step 04: Project settings
1. Click “Window“ (tab at top of the screen) > “Package Manager“
2. Wait until the complete list is loaded
3 Select “Vuforia Engine AR“ (HoloLens: additionally add “Windows Mixed Reality”


4. Click “File“ (tab at top of the screen) > “Build Settings“

5. Change the platform to “Android“ (or “UWP” for HoloLens development)

6. HoloLens only: select ‘HoloLens’ in the device tab and ‘ARM64’ for architecture
7. Click the “switch platform“ button and wait until finished and a window will appear
8. Click “Player settings“ and change the company name (“DefaultCompany“ may cause issues)
9. Android only: select the minimum platform that your app should be working with (most phones will run 8.0+, older will probably not be able to execute the app). you can find these settings still in the player tab > identification > minimum API level; then select ‘Android 8.0 Oreo‘
10. HoloLens only: Download the Mixed Reality Toolkit [MRTK] from via this link: https://github.com/Microsoft/MixedRealityToolkit-Unity/releases and make sure to download the package ending with “Foundation.2.4.0.unitypackage”.

Once downloaded simply drag and drop the downloaded file into your assets folder within unity. The package will install itself and might adjust some settings.

If everything goes well, a new tab will be added to the unity toolbar called “Mixed Reality Toolkit”.
11. Within the Player settings extend the “XR Settings” tab and click the checkbox for “Virtual Reality Supported”.

12. HoloLens Only: The Windows Mixed Reality SDK should be automatically selected within the XR Settings, if not please do so.
Step 05: create a new scene
1. In the ‘project’- panel navigate to the ‘Assets‘ > ‘Scenes‘ folder, right-click (inside this folder) and click ‘create‘ > ‘scene‘.
2. Name this new scene ‘Main‘ and open this scene.
3. Delete the ‘Sample scene‘
4. HoloLens only: click in the new menu tabs on ‘Mixed Reality Toolkit’ > ‘Add to the scene and configure…’

5. In the ‘Hierarchy‘-panel, right-click > Vuforia Engine > ARCamera
6. Delete the ‘Main Camera‘ object (HoloLens Note: the ‘Main Camera is located in under the ‘MixedRealityPlayspace’ object)
Step 06: get Vuforia license
1. With the 'ARCamera' selected in the Hierarchy-panel, ‘Open Vuforia Engine configuration‘ here you can see that the‘app license key‘ is empty.


2. Go to https://developer.vuforia.com/vui/auth/register and create an account, verify your email and login
3. Click on ‘get development key’
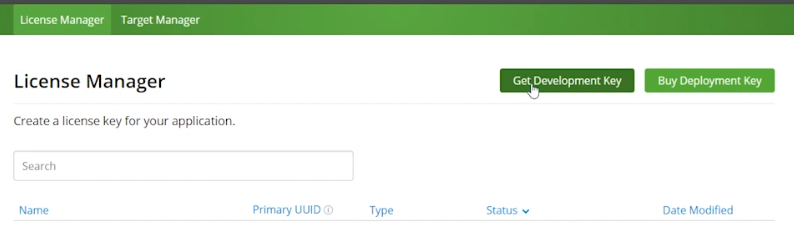
4. Type in a name for the key and click ‘confirm’
5. Click on the newly created key in the ‘License Manager’
6. Copy the license key
7. Go to Unity
8. Paste the key in the empty ‘app license key’ field (see step 6-1)
Step 07: Create an object you want to display in AR (in this example we will use a simple cube)
1. right-click in the hierarchy-panel > 3D object > cube 2. position the cube so it appears visible in the ‘game’-panel 3. test: hit the play button and you will see your webcam feed with the cube in there. 4. Stop the game (hit the play button again)
Step 08: create a visual marker to position the cube
1. add an ‘ImageTarget’ by right click in the Hierarchy-panel > Vuforia Engine > Image now a default image appears.

2. (skip this step if you already have an image target) Create a customized image target: go to https://www.the-qrcode-generator.com/ and create a QR code and save it on your computer. (you could also use any other kind of graphic, check the Vuforia recommendations here: https://library.vuforia.com/content/vuforia-library/en/features/images/image-targets.html)

3. go to the Vuforia developer portal in your browser > target manager > add database and type a name for your database 4. Select the database you just created > ‘Add target’ > add your target file and give it a size (0.05 is 5 cm), and click the ‘add’ button. (If the image gets denied, save it as a .jpg and try again) The target will now appear in your database 5. Download the database as a Unity package: click the ‘Download Database (All)’ button and select o ’Unity Editor’

6. Go to Unity and import the database: Assets > Import Package > Custom Package > find your downloaded database > ‘open’ > ‘Import’. Instead, you could also drag and drop it from your file explorer directly in the asset folder within Unity. 7. Change the image target to your QR code: select the image target in the Hierarchy-panel > find the ‘Image target behaviour’-script in the Inspector-panel and select your database. Now the QR code will show in the scene.

Step 09: Set up the image target with the cube
1. make the cube a child of the image target: drag and drop the cube on the image target in the Hierarchy-panel 2. reposition the cube on top of the QR code 3. position the QR-cube group so that it is visible in the game-scene
Step 10: test the game
1. Find a way to present the QR code, e.g. use your phone to show the QR code or print it on a sheet of paper. 2. Hit the play button, the cube will appear on top of the QR code when you hold the QR-target in front of the webcam. (note: when using the QR on your phone you might need to adjust the brightness level)
Step 11: Build the app and install
1. File > Build settings > ‘add open scenes’-button > Build

2.a Android only: Unity will directly generate the apk-file for you. Just transfer it on your mobile phone and execute it on your phone. The application will be installed automatically. (The developer mode may have to be enabled on the smartphone directly.) 2.b HoloLens only:
Unity will start building your application, depending on your resources this can take a few minutes.
Once finished, the file explorer will be opened with a new .sln file within. Double click it to open it with Visual Studio.
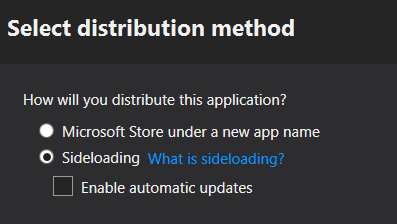
Wait until the project is fully loaded (may take 20-30 seconds), click on the ‘project’ tab > ‘Publish’ > ‘Create App Packages…’

In the pop-up, select sideloading and proceed.
Approve the signature of your unity project and click next.
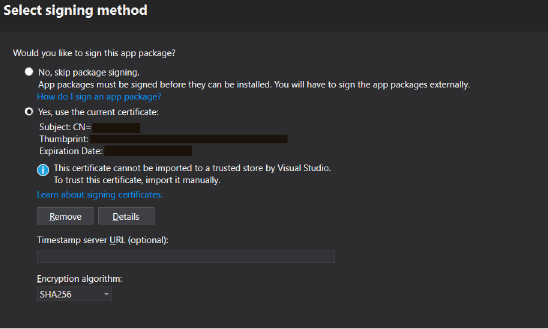
Deselect all architectures besides “ARM64” and change the solution configuration from “Debug” to “Release”. Click on create and wait for a few minutes!

Step 12: HoloLens only: Enabling HoloLens developer mode and installing an app package
1. On the HoloLens itself, open the ‘settings’ menu > ‘Update & Security’ and enable the developer mode. 2. Connect the HoloLens via the USB-cable to your computer 3. On your computer, open a new tab and enter: ‘ 127.0.0.1:10080 ’ and proceed with the login procedure. The mixed reality portal will open once logged in. 4. Once logged in, click on ‘Apps’ (left side of the mixed reality portal interface) 5. Within the ‘Install App’ panel, click on ‘browse…’ and search for your just created App package (.msix file). Located at “…\<Your application Folder>\AppPackages\<ApplicationName>\<ApplicationName>_1.0.0.0_ARM64_Test” 6. Once selected, enable the checkbox for additional dependencies and click on browse again. The dependency is located in the subdirectory “Dependencies/ARM64” 7. Once selected, click on ‘Install’ and wait until the application is successfully installed. The new application is now available in the menu of the HoloLens under “All Apps”.
List of tutorials
Unity AR development:
MRTK setup: https://www.youtube.com/watch?v=ZVrCngXJJwI


Comments