
Tutorial: get started with Unity
- May 15, 2020
- 6 min read
Updated: Aug 3, 2020
This tutorial explains step by step how to install Unity and explains the elements of the Unity-interface. The tutorial follows with a simple assignment to get familiar with the Unity-interface and with using scripts in Unity. In the assignment, you will create a simple scene with a button that prints a text in the console when it is clicked, and which changes the colour of a cube.

Step 01: Download and install Unity version 2019.3.12
In this tutorial we are using Unity version 2019.3.12 We recommend to use the same version of Unity when following this tutorial, to make sure everything works. You can install different versions of Unity via the unity Hub: https://unity3d.com/get-unity/download. When you have the Hub installed, you can select the specific version from the download archive and install it: https://unity3d.com/get-unity/download/archive.
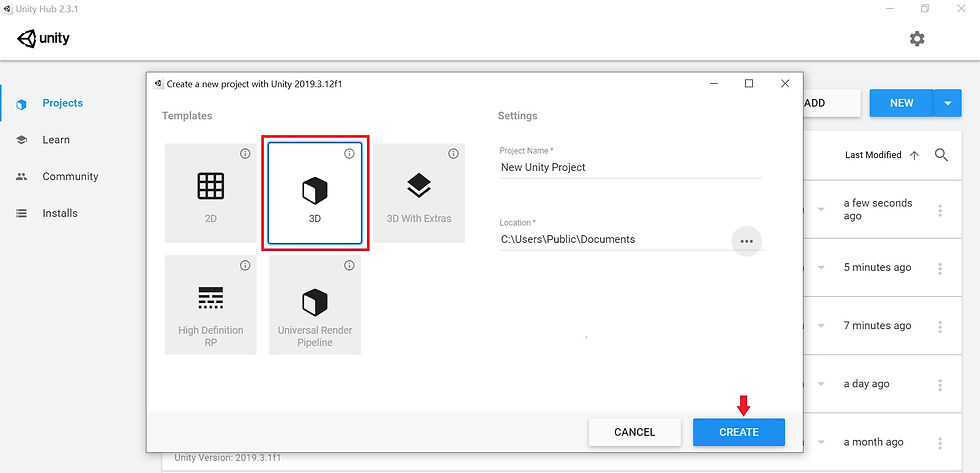
Step 02: Open a new project
1. Open the Unity Hub
2. Click ‘new’ (if you have multiple versions of Unity installed, click the arrow next to ‘new’ and select the version in which you want to create a project)

3. Select 3D, give it a name and specify the place where you want to store your project
4. Click ‘create’
Step 03: Get to know 'Unity'
Now you have created a new project and you can see the Unity interface which might be a bit overwhelming the first time. But soon you will get to know how to work with it. So before starting to create your first small Unity project, we will explain the interface briefly.
In the Unity tutorials that will be uploaded on this website we will refer to the different panels in the ‘Unity’ interface. The image below shows the names of each panel. As you can notice the names of the panels are shown in the tab above the panel, so you will always be able to find the name. This picture shows the standard configuration, but you can move the panels in any configuration you prefer. This also means that your interface might look different to the picture.

Structure of a Unity project: When you create a new Unity project, you will basically create a folder that holds all the files that are in your project. Inside a project you can have multiple scenes, which are virtual environments including (interactive) objects, lighting, UI elements, etc.
A short overview of the function of each panel:
Scene/ game panel:
The scene-view is where you are editing a scene of your application. When you click on the play button in the middle at the top, your application will start running. When you look in the game-view, you will see how the user will see the application (this is the perspective from the main camera).
Project panel:
The project panel includes all the files that are in your project, which are commonly organized in the following folders: scripts, materials, scenes, prefabs, etc. (but of course you can use any structure that works for you)
Hierarchy panel:
The hierarchy panel shows all elements that are in the scene that is currently opened.
Inspector panel:
When selecting an element in the hierarchy- or project-panel, the properties related to that element are presented. For example when you select an GameObject (for example a cube), the inspector panel shows its position, material, etc.
Console panel:
The console panel is where messages from the scripts are presented. These can be error- or warning messages, or messages that you created in code to know what is happening behind the scenes.
Asset store panel:
Here you can download assets and directly import them into your project.
Documentation
On the Unity-documentation-website you can find more information about how to use Unity: https://docs.unity3d.com/2019.4/Documentation/Manual/UnityManual.html
Navigation
One last topic that we will explain before starting to create something is how to navigate in a scene. There are a few ways to navigate:
Alt + r.mouse.click rotate
Alt + scroll.click pan
Scroll wheel zoom
Here you can find more details on navigating in the scene view: https://docs.unity3d.com/520/Documentation/Manual/SceneView.html
Step 04: Furnish your first Scene
For this tutorial you will create a scene in which you have a button and a cube, when you click the button, the cube will turn into a random colour and a text will be printed in the console. In this step you will set up the scene, and in step 6 we will add the interaction.
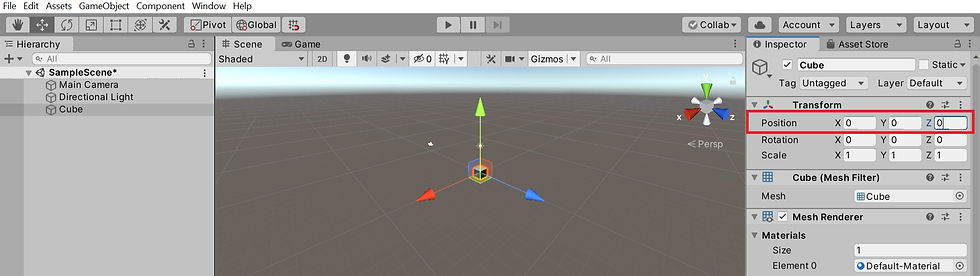
1. Create a cube and place it at the origin:
Right click in the hierarchy-panel --> 3D object --> Cube
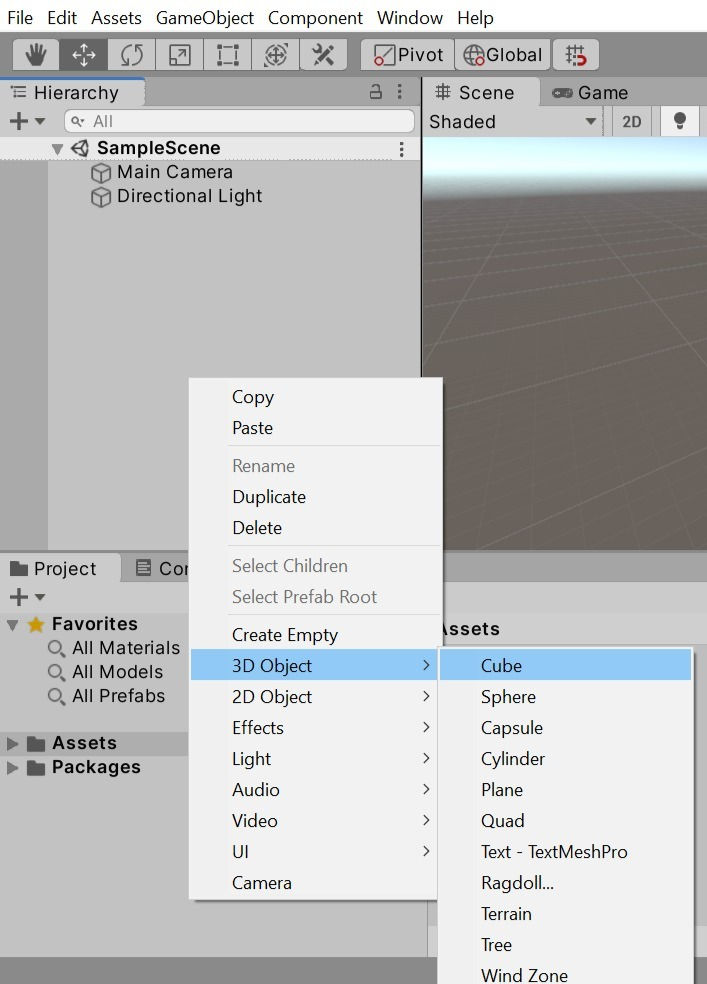
With the cube selected, go to the Inspector and set the x, y and z for Position (under Transform) to 0.
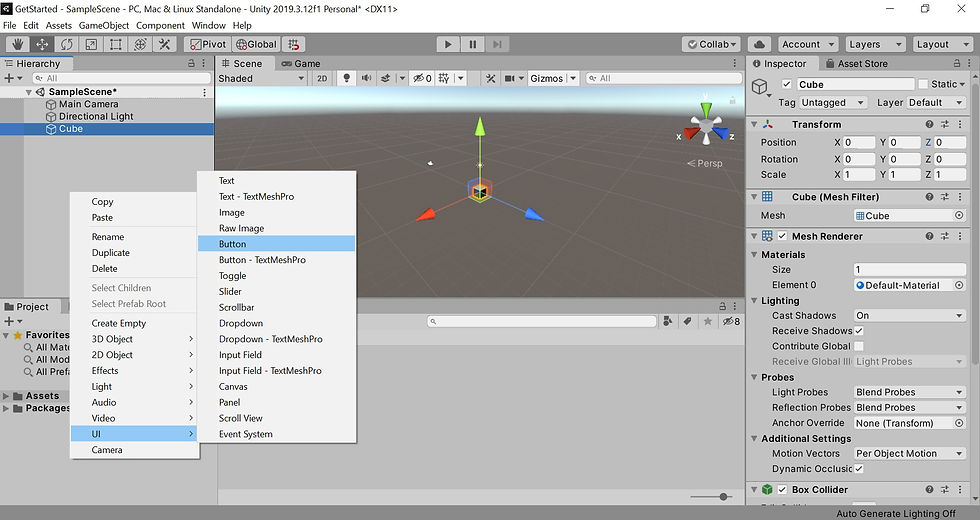
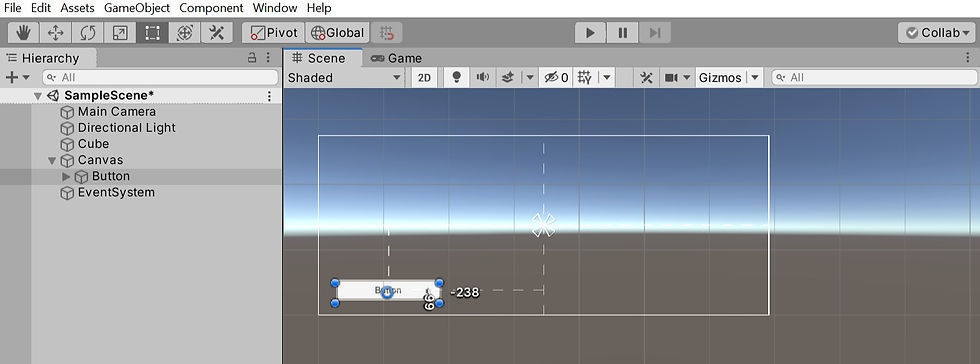
2. Create a button and place it at a corner of the screen:
Right click in the hierarchy-panel --> UI --> Button
Double click the ‘Canvas’ in the Hierarchy-panel to see where on the screen the button is located. If you don’t see the canvas from the front, click the ‘2D’ button at the top of the scene-view-panel.
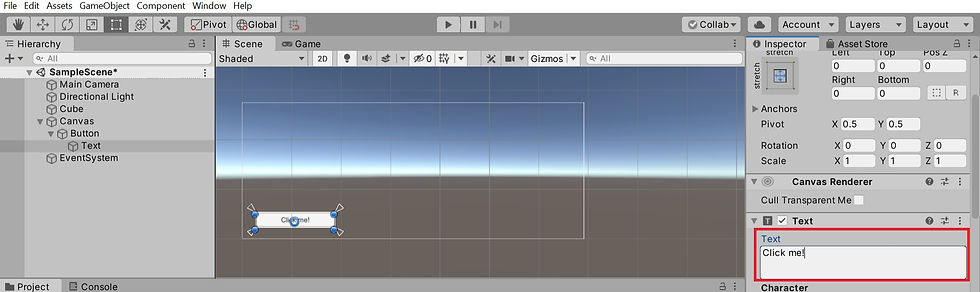
3. Edit the text on the button
Select the text of the button in the hierarchy panel (canvas --> button --> text)
Find the ‘text’ section in the inspector and type “Click me!”
Step 05: Create your first C# script
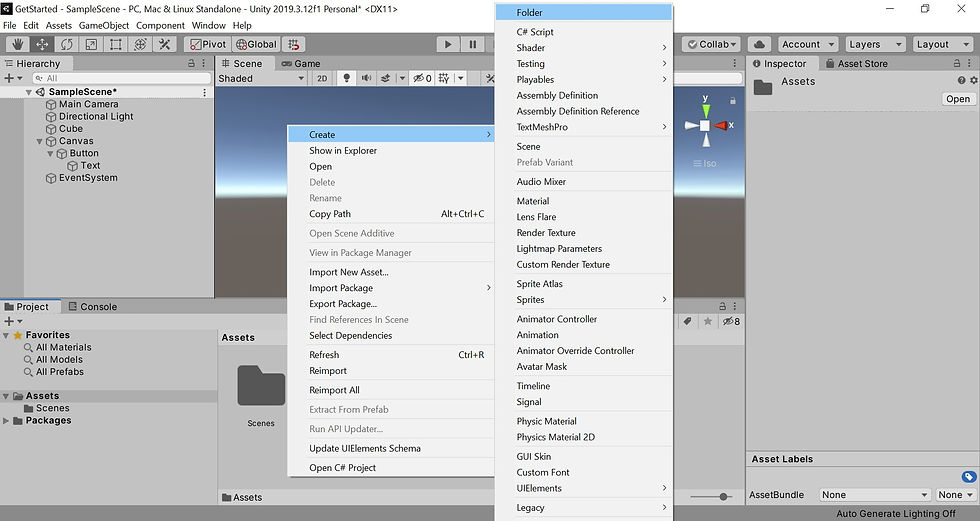
1. create a new script
Create a scripts folder: go to the assets folder in the project-panel, right click --> Create --> Folder. Name the new folder ‘Scripts’
Open the new scripts-folder you just created, right click --> Create --> C# script. Name the new script ‘ClickButton’
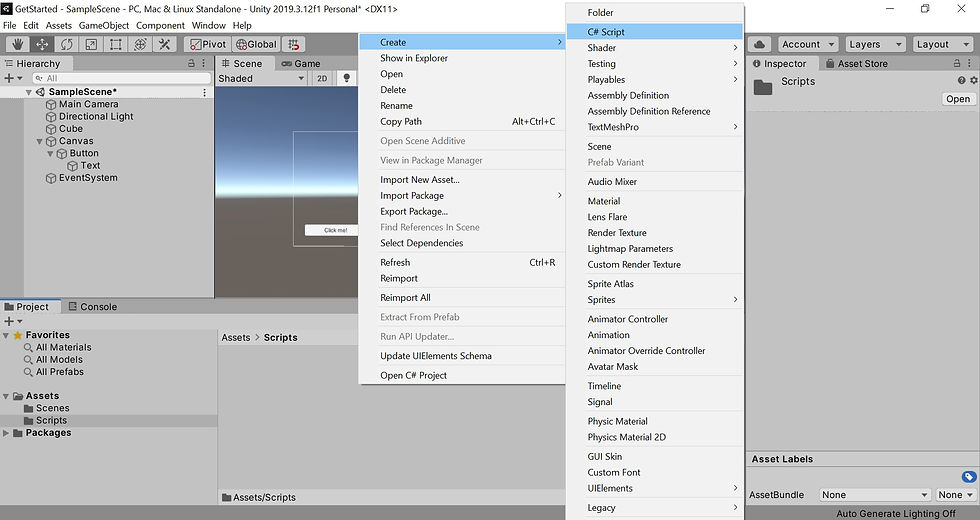
Be careful, when changing the name of a script, be sure to also replace the name of the class inside the script file with the EXACT SAME name as the name of the script!!
2. Open the ClickButton-script by double clicking it (in Visual Studio). When you open a newly created script from Unity, the script will look like this:
using System.Collections;
using System.Collections.Generic;
using UnityEngine;

public class ClickButton : MonoBehaviour
{
	// Use this for initialization
	void Start ()
	{

	}

	// Update is called once per frame
	void Update ()
	{

	}
}
The ‘using’ statements on top are the namespaces that are used. Here you could add other namespaces as well when you need specific functions. We will not change or add namespaces in this tutorial.
The script follows with a class that has the same name as the script-file itself. The class inherits from MonoBehaviour, which provides life cycle functions for the script. Examples of functions that use MonoBehaviour are the void start, and void update methods, which are also in the script already.
3. Create a trial script: add the code below in the start method and save the script. We use this code to show how a script works in Unity, this code will print the text in the console once you play the scene.
public void Start()
{
    Debug.Log("Hello  world");
}
4. Test the script:
go back to Unity
add the script to the MainCamera: with the MainCamera selected in the hierarchy-panel drag and drop the ClickButton-script from the project panel to the inspector-panel, release when a blue line appears and the script will be added to the MainCamera.
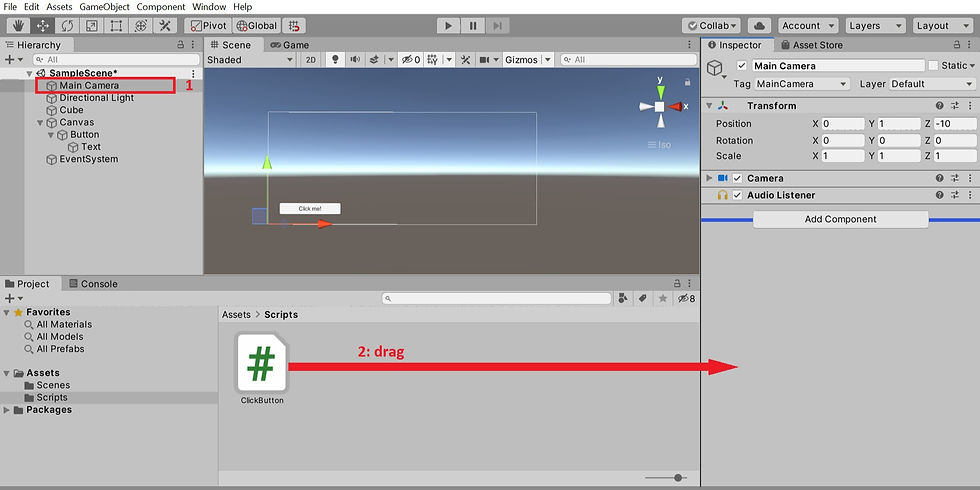
press the play button
look at the console and see if it works. You should see the text “hello World” printed in the console.
Step 06: adding interaction
Now you have created the elements in the scene and know how to create and execute a script. In this last step will add interaction to the button to change the colour of the cube.
1. Open the script ‘ClickButton’
2. Clean up
Delete the line of code we added in the start-method in the previous step
Delete the void start and void update methods from the script
3. Create the code
We need get access to the cube we created. Add the following line inside the ClickButton class:
public GameObject _cube;Add interaction to the button: change the colour of the cube when clicking and inform status by printing text in the console. Add the following method inside the class:
public void OnClick()
{
 _cube.GetComponent<MeshRenderer>().material.color = new Color (Random.value, Random.value, Random.value);

 Debug.Log(“You clicked the button!”);
}
4. Save the script and go back to Unity
5. Set up the script for use
Create a new empty GameObject: r.click in the hierarchy --> Create Empty. Rename it to ‘ClickButton’.
Drag and drop the CreateButton-script (from the project-panel) onto the CreateButton-GameObject (in the hierarchy).
With the ClickButton-GameObject selected, drag-and-drop the Cube (from the hierarchy) onto the Cube field of the ClickButton script in the inspector.
6. Make the button functional
With the button selected in the hierarchy, go to the inspector and click on the + button (Add to List) in the OnClick() section.

Drag and drop the CreateButton-GameObject (in the hierarchy) to the [None (Object)] field (see screenshot below).
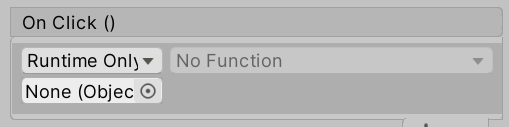
In the drop-down menu [No Function] select the OnClick-function: ClickButton --> OnClick

7. Save the project
8. Test it by clicking on the play-button. Every time you click on the button, the colour of the cube should change to a random colour, and on the console will be printed that you clicked the button.


Comments