
LMS develops a Robot control Training environment
- Dec 23, 2021
- 3 min read
During the Development Sprints LMS developed a Virtual Environment of a shopfloor to be used as a training ground for persons inexperienced at working with robots. The methodology followed to implement the robot control is based on the robot URDF imported from ROS. A custom controller script was developed to manipulate the joint values of the URDF model. Through an interface that resembles the robot Teaching Pendant the user can control the robot to perform an assembly operation.
Overview
The Robot Control Training Environment repository contains a compiled software that can be used for training of personnel on how to control an industrial robot from the teaching pendant.
The application is built to replicate the human – robot interaction through the teaching pendant interface, giving a first impression to the user on how a robot can be operated. This virtual training environment is also a safe environment where possible mistakes will not harm the operator or result on potential damage the robot or other equipment.
The application provides a first person view from a virtual mannequin to give the feeling at the user that he/she is inside this virtual shopfloor (see below).

Virtual environment of the shopfloor
Intended learning outcomes
The basics on how an industrial robot is operated and controlled offline.
Familiar on controlling a robot from the teaching pendant, through virtual experience.
How to use Robot Control Training Environment
The user can navigate inside the shopfloor with the use of “WASD” or the arrow keyboard buttons and look around using the mouse. The robot that the user is called to control is a COMAU Racer7-1.4, and the task the user has to perform is the assembly of a water pump.
The user has to get close to the robotic cell (see picture below), where a message will prompt to pick up the robot Teaching Pendant. With the press of the “E” button of the keyboard the mannequin can pick up or place down the robot TP accordingly.

Racer 7 robotic cell
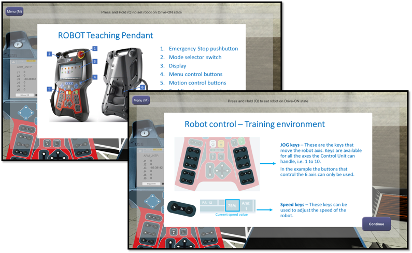
The first time the user will pick up the robot Teaching Pendant a pop-up window (Figure 3) will display general information regarding the robot Teaching Pendant that describe the functionalities of the different buttons.
After going through all the information provided from the pop-up window, a Teaching Pendant interface will be displayed at the screen. From this interface the user will be able to manipulate the position of the robot, replicating the process as it was in the real world.
For the robot to be able to move Drive-ON state should be enabled. A notification at the top of the screen prompts the user to press and hold “Q” button to enable drive on state. When the “Q” button is pressed, and the robot is in Drive-ON state the LED indication at the TP will turn green.

At the current release of the application not all the buttons of the TP interface are functional. The user can manipulate the 6 axis of the robot, trigger the gripper to perform a grasp, and change the robot speed
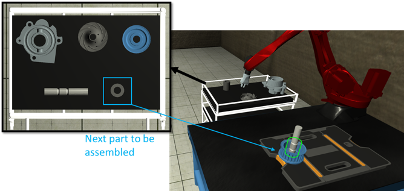
For the robot to grasp a part, the user has to move the gripper close to the part and then press the “Gripper I/O” button on the TP. Then the user will have to manipulate the robot in such a way so that the part will be aligned with its outline (final position in the assembly). When the part reaches the final position, it will automatically detach from the robot gripper. The user will follow the same process with all the parts until the assembly is complete.


Comments